Wednesday, May 26, 2010

The Best Fried Chicken Sandwich at Williamsburg's Diner


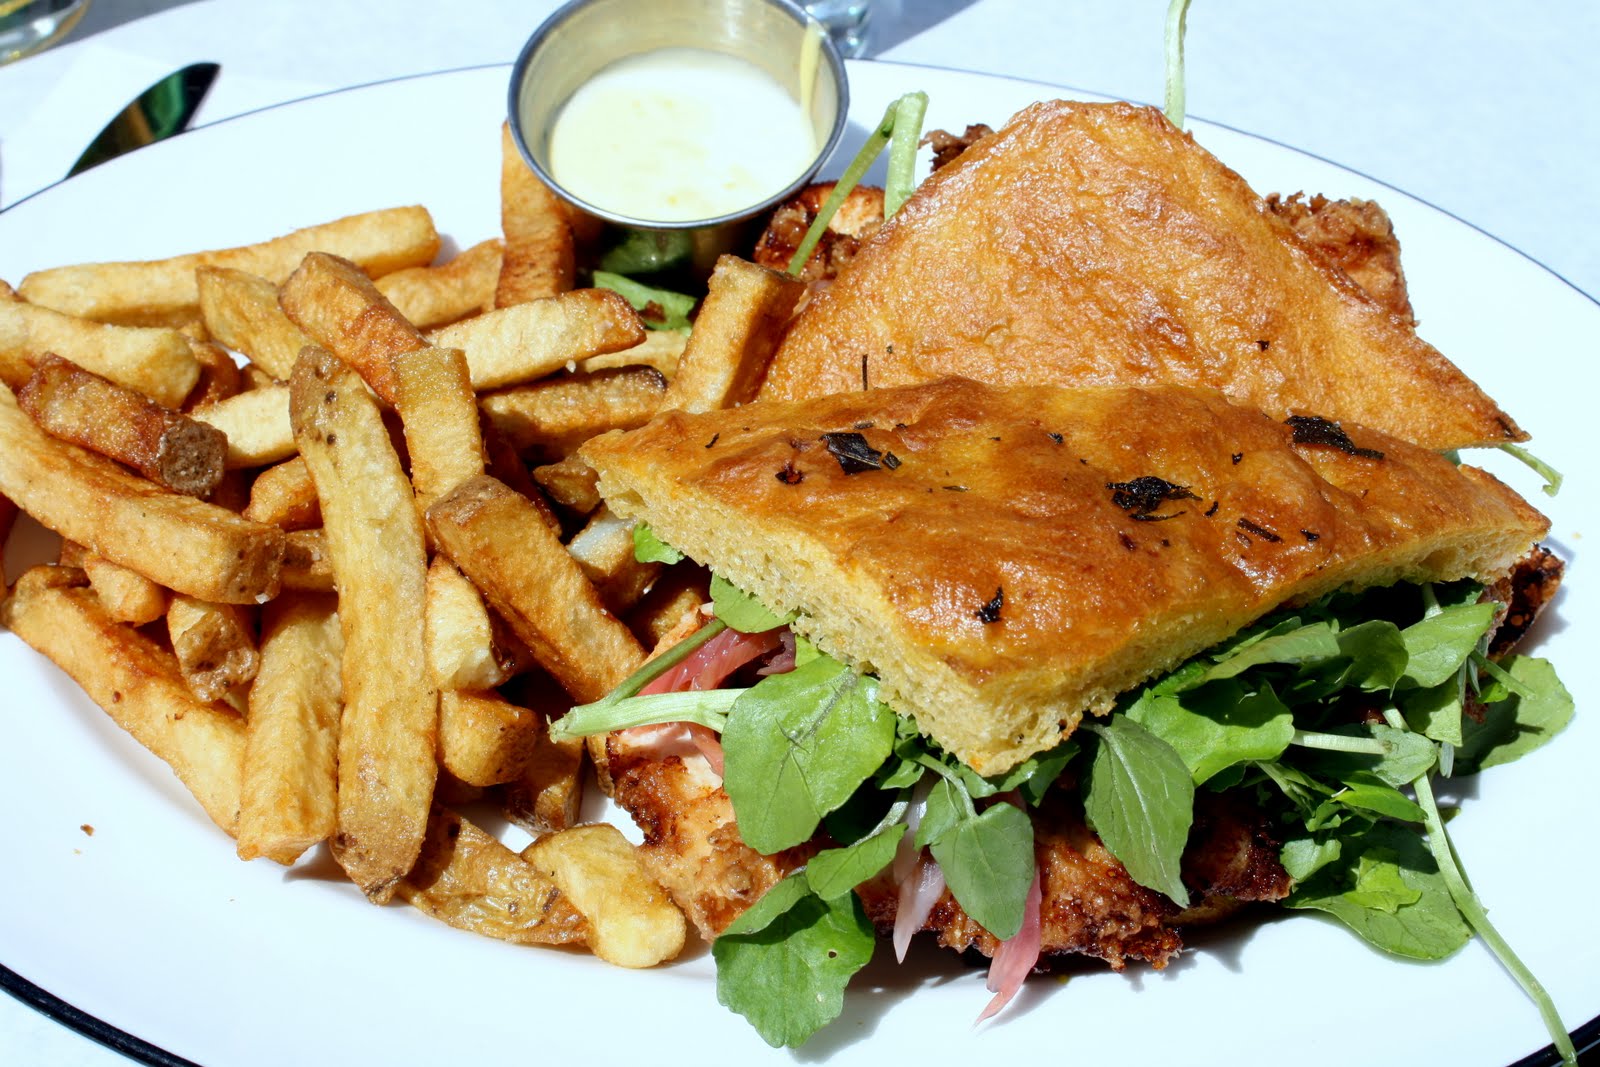
I hate to post something that is probably no longer available, but two weeks after eating it, I still can't get the fried chicken sandwich served at Williamsburg's Diner out of my head.  A lunch special the day I visited, the sandwich was stuffed full of some of the juciest and most flavorful fried chicken I have ever tasted.  The chicken was clearly fresh from the fryer, not the refrigerator like almost every other fried chicken sandwich I have ever had.  As if the chicken needed anything else, the sandwich also contained bitter dandelion greens and a peppery ramp aioli to moisten the bread.  I feel safe in stating that there is no better fried chicken sandwich out there.  While you will most likely have to wait until next spring to have the sandwich with ramp aioli, the reviews of Diner that I have read indicate that renditions of the fried chicken sandwich make frequent appearances on the restaurant's specials list.  I suggest you make your way to Williamsburg as fast as you can.  The neighborhood isn't for everyone, but Diner's fried chicken sandwich is. 

Diner
85 Broadway
Brooklyn, NY 11211

Sunday, May 23, 2010

Frittata with Ramps, Crimini Mushrooms, and Bacon


Whereas I tend to follow the less is more approach to cooking, when it comes to making frittatas, I show little restraint.  A frittata is my preferred means to use up every last bit of produce that I have in my refrigerator.  This one was no exception, providing an  eggy disposal for my last ramps of the season, some crimini mushrooms for which I had not yet found a use, and a tiny block of Emmentaler cheese.  I tossed in a small handful of slab bacon as well to make the dish hearty enough for supper. Voila. Dinner made and refrigerator cleaned.


Frittata with Ramps, Crimini Mushrooms, and Bacon

Ingredients:
  • 10 eggs
  • 3 tbsp cream
  • 1 cup Emmentaler cheese, grated
  • 1/4 pound slab bacon, chopped into 1/2 inch pieces
  • 1 bunch ramps, cleaned, roots removed, and chopped into 1-inch pieces
  • 1/4 lb crimini mushrooms, cleaned and stems removed
  • salt and pepper
  • 1 tbsp butter, divided into two pieces

Directions:
  1. In a large bowl, whisk together the eggs and cream.  Stir in the cheese and set aside.
  2. Heat deep half of a frittata pan or a large skillet over medium-high heat.  Add the bacon and cook until it is crispy, 3 to 4 minutes.  Remove the bacon with a slotted spoon and let it drain on paper towels. 
  3. Add the mushrooms and ramps to the bacon fat, keeping the heat at medium-high.  Season the ramps and mushrooms with salt and pepper.  Cook, stirring occasionally, until the ramps and mushrooms begin to brown, about 5 minutes.  Remove the ramps and mushrooms from the skillet with a slotted spoon and set them aside.  Remove the pan from the heat and clean it out with a paper towel.
  4. Once the bacon, ramps, and mushrooms are cool, add stir them into the eggs.  
  5. Heat the deep half of the frittata pan over medium heat and add 1/2 tbsp of the butter.  Once the butter stops foaming, add the egg mixture to the pan.  As you cook the eggs, use a spatula to lift the cooked edges of the eggs to allow the uncooked eggs to flow underneath.  Cook the eggs for 4 minutes.  
  6. Cover the eggs with the shallow half of the frittata pan and continue to cook until the frittata is almost completely set, 13 to 15 minutes.  
  7. Uncover the eggs and heat the shallow half of the frittata pan over medium heat.  Add the remaining 1/2 tbsp of butter melt it until it stops foaming.  Recover the eggs with the shallow half of the frittata pan and flip the pan.  Continue to cook the eggs until the are cooked through, 3 to 5 minutes.  Slide the frittata onto a plate.  Serve warm or at room temperature.

Wednesday, May 19, 2010

Brined Pork Tenderloin with Salsa Verde


A recent visit to Williamsburg, Brooklyn, brought me to The Meat Hook, one of two hipster-run butchers--the other being Marlow and Daughters--that has recently opened in the neighborhood.  Although I lauded these new school butchers for their focus on selling locally-sourced meats and offering off-cuts that are difficult to find elsewhere, I remained skeptical of  young, hip, personable butchers, and with nary a scar on their arms.  Could the cool butcher's at The Meat Hook possibly be better than the gruff, old-school butchers from whom I am more accustomed to purchasing my meat?  There was only one way to find out.

Staring at the wide array of sausages and cuts in the meat case, I had no idea what to purchase.  Slightly intimidated by the butcher, who not only was better-looking than I, but could also break down a whole hog in the time it takes me to chop a bunch of parsley, I blurted out "I'll have what she's having," unsure of whether the lady in front of me was more excited by the butcher or the tenderloin from locally-bred pork that he was trimming for her.  The kind butcher went to the meat locker, pulled out a tenderloin and began trimming it for me.  Five minutes later, I was on my way back to Manhattan, pork tenderloin in hand. 

Once home, I prepared the pork as simply as I could.  I brined it using Thomas Keller's brine from Ad Hoc at Home in order keep the lean meat moist as it cooked.  I seared it and then roasted the tenderloin as per Keller's instructions and topped it with a refreshing salsa verde.  Alongside the pork, I served roasted asparagus topped with a poached egg.  

The verdict? While the brine no doubt helped make the pork exceptionally juicy and tender, I have to commend my butcher at the Meat Hook, who sold me an excellent piece of meat.  Eddie - 0, Meat Hook Butcher - 1. 

Brined Pork Tenderloin with Salsa Verde
Serves 6

For the Brine:
  • 1/4 cup plus 2 tbsp honey
  • 12 bay leaves
  • 3 rosemary sprigs
  • 1/2 bunch thyme
  • 1/2 bunch parsley
  • 1/2 cup garlic cloves, crushed
  • 2 tbsp peppercorns
  • 1 cup kosher salt
  • 8 cups water
For the Salsa Verde:
  • 1 cup parsley leaves
  • 1/2 tsp red pepper flakes
  • 1/2 cup bread crumbs, toasted
  • 1 clove garlic, peeled and crushed
  • 1/2 cup olive oil
  • 2 tbsp lemon juice
  • salt, to taste
For the Pork:
  • 2 1 lb. pork tenderloins
  • salt and pepper
  • olive oil
  • 2 tbsp butter
  • 2 garlic cloves, crushed
  • 6 thyme sprigs
  • 2 rosemary sprigs
Directions:
  1. Make the brine a day ahead of cooking the pork.  Combine the honey, rosemary, thyme, parsley, garlic cloves, peppercorns, kosher salt, and water in a large pot and bring to a boil.  Boil the brine for two minutes, stirring it well to dissolve the salt.  Remove the pot from the heat and bring it to room temperature.  Place the brine in the refrigerator and let it cool overnight. 
  2. Place the pork tenderloins in the brine and refrigerate them for 4 hours.  
  3. Meanwhile, prepare the salsa verde.  Combine the parsley leaves, bread crumbs garlic, and pepper flakes in the bowl of a food processor.  Pulse the mixture a few times until the ingredients are chopped and well-combined.  Then, slowly pour in the olive oil while running the food processor.  Blend until a smooth paste forms.  Stir in the lemon juice and taste for salt.  Set the salsa verde aside or refrigerate it for a later use.
  4. Preheat the oven to 350F.
  5. Remove the pork from the brine.  Rinse it off and pat it dry with paper towels.  Season the pork with salt and pepper.
  6. Heat the olive oil in a large skillet over medium-high heat.  Add the pork and until it is well-browned on all sides, about 6 minutes.
  7. Add the butter, garlic, thyme, and rosemary to the pan and cook for another 2 minutes, turning the pork frequently and basting it with the butter.
  8. Transfer the pork to a roasting rack.  Place it in the oven and cook until it is cooked through, about 20 minutes.  Remove the pork to a plate and tent it with foil.  Let the pork rest for 15 minutes.
  9. Slice the pork on the bias into 3/4-inch slices.  Serve it with the salsa verde. 

Monday, May 17, 2010

Mini Cupcakes from Baked by Melissa in SoHo


It was only a matter of time before someone took the cupcake trend to a whole new level.  That someone is Melissa, who by selling miniature cupcakes from a window on Broadway in SoHo, has found a way to break the classic cupcake free from its paper lining.  While Baked by Melissa is not the first bakery to sell mini cupcakes in Manhattan, it is the only shop that exclusively sells the smaller cupcakes.  It's not a bad business plan.  Each cupcake is about a fourth of the size of it's larger counterparts, yet at $1 each, costs a third the price of a regular size cupcake at most other bakeries in Manhattan.  Plus, their small size only encourages you to eat more cupcakes than you should, ensuring a nice profit for Melissa.  As for the cupcakes, well they are no match for Two Little Red Hens.  Among the flavors Significant Eater and I tried (red velvet, cinnamon, peanut butter cup, cookies and cream, cookie dough), most were much too sweet for my taste.  The one I did enjoy was the peanut butter cup, basically a Reese's in cupcake form, a magical phrase in my book. Nonetheless, the sweet mini cupcakes are sure to please a lot of people and bringing in a platter of Baked by Melissa cupcakes will no doubt earn you plenty of friends at the office.  

Baked by Melissa
529 Broadway (between Spring St. and Prince St.)
New York, NY 10012

Wednesday, May 12, 2010

Bacon Dashi with Mussels and Potatoes


"Man, you go through a lot of bacon!" Significant Eater exclaimed the other day as she watched me simmering half a pound of the good stuff to make the recipe for Bacon Dashi from Momofuku. 

"Don't worry, it's just a broth that contains the essence of bacon," I reassured her.  "I skim off all the bacon fat at the end, so it's actually not that bad for you.  Kind of like the idea behind Snackwells, but with much better flavor."

"Hmm, well that's a ton of bacon you have simmering.  Skim it well."

With the most persuasive tone I could muster, I said, "Don't worry.  And we're having mussels with it.  See? Healthy!"

"Wait... what's that?" She said skeptically.

"Just a little crispy bacon to top off the dish,"  I calmly answered.

She shrieked, "What! More bacon?"

"Oh yeah...sorry.  But trust me, it'll be worth it."

Tasting a mussel with a spoonful of broth, she said, "Wow...that's amazing."

"Bacon just makes everything better, doesn't it?"


Bacon Dashi with Mussels and Potatoes
Adapted from a recipe for Bacon Dashi with Clams and Potatoes from Momofuku

For the Bacon Dashi:
  • 2 sheets konbu (dried kelp, available at Japanese markets) 
  • 8 cups water
  • 1/2 lb smoky bacon
For the mussels:
  • 1 lb small fingerling potatoes, scrubbed
  • 2 lbs mussels, thoroughly scrubbed and debearded
  • 1/4 lb bacon, cut into 1-inch pieces
  • soy sauce, to taste
  • mirin, to taste
  • 1/4 cups scallion greens, thinly sliced
Make the dashi one day ahead of time to allow the fat to bacon solidify so it can easily be spooned off:
  1. Rinse the kelp under cold running water.  
  2. Place the kelp in a large pot with the water and bring it to a simmer.  Turn off the heat, and let the kelp steep for 10 minutes.  
  3. Remove the kelp from the pot and add the bacon.  Bring the water to a boil, then reduce the heat to a simmer.  Simmer for 30 minutes.  Remove the bacon and discard it.  
  4. Let the dashi come to room temparature, then chill it in the refrigerator.  Once the dashi is chilled, spoon off the layer of solidified fat that will have risen to the top of the liquid.  Proceed with the rest of the recipe.
To cook the potatoes and mussels:
  1. Cook the bacon in a large skillet over medium heat until it is crispy.  Remove the bacon with a slotted spoon and drain on it paper towels.
  2. Bring the dashi to a boil, then reduce the heat to a simmer.  Place the potatoes in the dashi and simmer them until they are fork tender, 15 to 20 minutes.  Remove the potatoes with a slotted spoon and reserve. 
  3. Bring the dashi to a boil and add the mussels. Cover the pot and cook until nearly all of the mussels are open, 8 to 10 minutes.  Remove the pot from the heat, and discard any mussels that do not open. 
  4. Add the potatoes to the dashi to heat them through.  Taste the dashi for seasoning.  If it needs salt, add a splash of soy sauce.  If it needs sweetness, add a splash of mirin. 
  5. Ladle the dashi into large bowls.  Place a few mussels and potatoes in each bowl and top each dish with the bacon and scallions.  Serve immediately. 

Tuesday, May 11, 2010

Thomas Keller's Ad Hoc Meatballs


Meatballs are all the rage in New York these days, appearing on menus all over city.  Hell, there's even The Meatball Shop, a Lower East Side restaurant dedicated to all things meatball.  Naturally, I decided to make meatballs at home this past weekend using Thomas Keller's recipe from  Ad Hoc at Home.  Why leave my apartment for meatballs when I could make my own using a recipe from one of the best chef's in the country? 

It's hard to pinpoint exactly what makes the Ad Hoc meatballs so great.  The mixture is fairly traditional: ground chuck, sirloin, pork, and veal, an egg, breadcrumbs, parsley, sauteed garlic and onions, salt and pepper.  I suspect it's the combination of ground meats that makes the difference, giving each meatball the perfect fat ration. 


 One of the key touches to Keller's meatballs is a small cube of fresh mozzarella cheese that gets inserted into the middle of each meatball prior to cooking them.


In my limited meatball experiences, I have only braised them in tomato sauce.  Keller's are roasted at 425F.  I was concerned that roasting at a high temperature would dry out the meatballs, but the combination of meats and cheese keeps these quite moist.  As anal as Keller supposedly is in the kitchen, I'm sure he would discard any meatball that springs a mozzarella leak, but I think it just makes it more enticing.  Significant Eater actually insisted on being served this one. 


I topped Keller's meatballs with Marcella Hazan's classic tomato-butter sauce, making it a old school meets new school meal. 

Monday, May 10, 2010

Shrimp & Grits, Momofuku Style


Having spent equal parts of my life in the Southeast and the Northeast, I was eager to make the recipe for shrimp and grits from the Momofuku cookbook.  Keeping the central components of the classic Southern dish intact while adding a small dash of New York edge, Momofuku's shrimp and grits achieves the right blend of North vs. South, something this blogger has been trying to achieve his whole confused life.  As difficult as it can sometimes be to tame New York 'tude with Southern charm, David Chang shows that it's pretty easy to do so on a plate. 

The hardest part about this shrimp and grits dish is sourcing the ingredients.  I had the good fortune of finding Anson Mills grits--the same South Carolina grits that Momofuku and seemingly every other higher-end restaurant in America with a grits dish on its menu use--at Formaggio Essex in New York's Essex Street Market.  It's worth it to search these grits out or splurge and order them online; they are the best grits out there, tasting as if the corn used to make them had been shucked just days before the grits were ground.


Aside from the grits, the only other ingredient you need to seek out is konbu, or dried kelp, that goes into the Bacon Dashi in which you boil the grits.  Fortunately, New York has no shortage of Japanese markets that carry konbu, but if you can't find it, you should be able to get by with boiling the grits in chicken broth. 

Ingredients and some splattering grits aside, this Momofuku's dish is easy to pull off.  Boil the grits, stir in a stick of butter (I didn't say this was healthy), cook the bacon, sautè the shrimp, poach some eggs, and stir it all together with a few splashes of soy sauce and some scallions and you have an excellent, North-meets-South-meets-Far-East meal.

Sunday, May 9, 2010

Shake Shack's Ramp Dog


I don't count myself among those New Yorkers who are willing to stand in line all afternoon for Shake Shack, but finding myself on the Upper West Side this past Saturday, I could not resist braving the long line outside the restaurant to try the Ramp Dog.  Available for one day only, this hot dog was topped with griddled ramps and applewood smoked bacon butter.  Washed down with a malted chocolate shake, it was worth the wait in line.  Enough said?

Tuesday, May 4, 2010

Sights from the Hester Street Fair

While Manhattan isn't quite hipster enough to have anything like the Brooklyn Flea, the Hester Street Fair, does a great job of giving Manhattanites an opportunity to shop for vintage goods and eat some great food without having to make that dreaded crossing into Brooklyn.  Founded by MTV correspondent Su-Chin Pak, the fair takes place on the Lower East Side every Saturday and Sunday from 10am to 6pm.  It will remain open through December, and there will be a constant rotation of vendors, so keep coming back to see what's new.  A sampling of the Hester Street Fair's offerings follows.


 The fair takes place at the north end of Seward Park in the Lower East Side:


The menu at outside of the An Choi booth, serving shrimp spring rolls and several varieties of banh mi:


 The An Choi shrimp spring rolls:


The An Choi basil meatball banh mi, which was superb:


A Mexican spice blend from the spice vendor:


Cool down with the Mexican popsicles (paletas) from New Yorkina:


A hibiscus raspberry paleta from New Yorkina (I swear I know the person enjoying it!):


Baked goods from Pain D'Avignon bakery, which recently opened a stall in the Essex Market:


Boots from one of the many vintage clothiers:

LinkWithin

Related Posts with Thumbnails