Monday, March 30, 2009

Momofuku Milk Bar


I usually don't fall for hype. Spotted Pig? Eh. Corner Bistro? Utterly overrated. However, I have joined the masses in being completely won over by all things Momofuku. My latest obsession is Momofuku Milk Bar. I have been several times so far, sampling many of the sweets on the abovc menu as well as the great, if overly expensive, Momofuku pork buns. All of the desserts I have tried have a nice combination of salty and sweet. Some may find them to be overly salty, but I find them perfect. Not to be missed are the corn cookie, cornflake marshmallow chocolate chunk cookie, and best of all, the compost cookie, a wonderful mix of pretzels, potato chips, butterscotch chips, and, chocolate chunks. Try it before you knock it! The cereal milk soft serve is nice as well, and I was pleased to find that the flavor of my cereal milk panna cotta was dead on. I can't wait to try the breads, pies, and cakes, on subsequent visits.

Friday, March 27, 2009

Kefi: Greek Comfort Food on the Upper West Side

Last Friday, after feeling guilty about the giant slap in the face we gave the recession by attending a yoga, chocolate, and wine tasting (it was free, but still...), my girlfriend and I redeemed ourselves by having dinner at Kefi on the Upper West Side.

Kefi had been on my list of restaurants to go to ever since it opened a few years ago in its original location, where it gained renown for delicious Greek food served at bargain prices. Kefi's co-owners Michael Psilakis and Donatella Arpaia have since become rockstars in the NYC dining scene, opening other two other well-acclaimed restaurants (Anthos and Mia Dona), and even cooking at the White House. As with most inexpensive and good restaurants in New York, Kefi was a madhouse in it's old location and Psilakis and Arapia recently moved the restaurant to a much larger location on Columbus Avenue between 84th and 85th St. It remains a madhouse, for at 9:45 on a Friday night, it was packed to the gills. Psilakis and Arpaia have certainly found one way to get by during the recession.

I was surprised at just how large the new location is. Although, I had never been to Kefi in the old location, I had eaten at its previous incarnation (and Psilakis' very first restaurant) Onera, and it was a fairly small space. Kefi now takes up two floors, each with multiple dining sections. I would call the decor Greek isle kitsch, with Greek trinkets hanging on the walls and ceilings. The servers wear royal blue t-shirts with the restaurant's name in large print. A date restaurant, Kefi ain't.

Many reviewers have complained that the new location of Kefi is not as the original. Among the detractors, consensus is that the new Kefi is cooking by the numbers, serving unrefined Greek food to please the masses. The food we had was fairly formulaic in preparation and the plating was not pretty by any means, it was very good and comforting.

My girlfriend and I started with the fried calamari, an menu item that we order at nearly every restaurant that serves it. Kefi's version was as good as any; simply prepared and served with lemon wedges. Intermixed with the calamari were fried chickpeas, a very nice surprise; a few fried lemon slices were also on the plate, a not so nice surprise that I assume a sloppy chef must have dropped into the fryer.

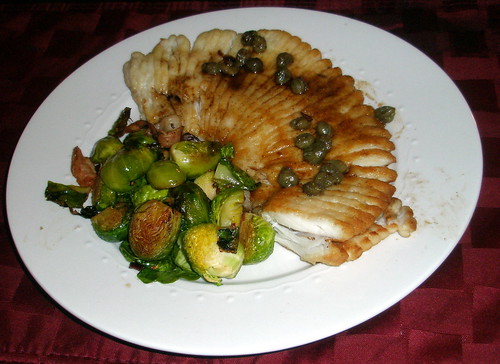
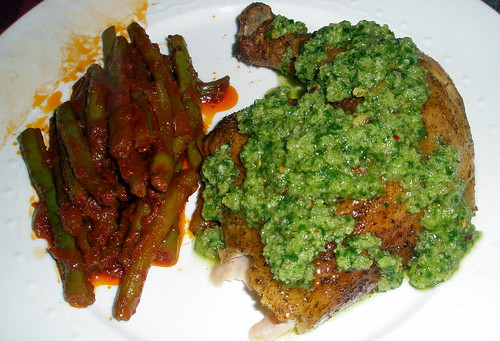
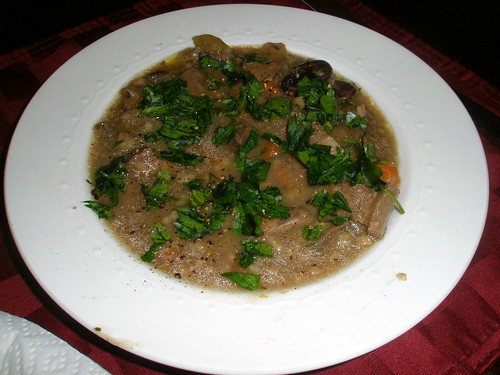
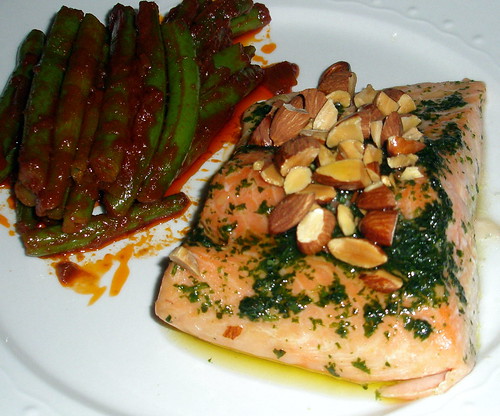
For a main, I ordered the braised lamb shank, which was served with orzo and lots of what I believe was a red wine-based braising liquid. The lamb was fairly sloppily plated, with the sauce all over the place, but the bad plating was fairly endearing, reminding me of the comforts of a homecooked meal. The lamb, I should add, was delicious, especially at $15.95. My girlfriend went with the seared striped bass, which was served with potatoes, green beans, capers, and olives. Again, the dish did not look so pretty on the plate, but that did not detract from the taste. The fish was cooked nicely, and the capers and olives gave it a nice briny flavor.

Kefi is one of those rare Manhattan restaurants where I left feeling like I made a steal. I would have been pleased with the restaurant even if the dishes cost just a few dollars more. Kefi is not fine cuisine, but in this economic climate, that is not a bad thing. It is on the other side of town from me, but Kefi is still worth the small cab fare, and I will certainly return.

Tuesday, March 24, 2009

Chicken Adobado

Tonight's dinner was Chicken Adobado from Molly Stevens' All About Braising. It's so simple: your marinade about 10 chicken thighs marinated for an hour in a mixture of a half cup each of water and white vinegar, zest from two limes, a large splash of soy sauce, two teaspoons of brown sugar, two bay leaves, and salt and pepper. Then you cook the chicken in a covered skillet for about 45 minutes, flipping the thighs occasionally. Finally, you brown the chicken in a second skillet while reducing the braising liquid in the original skillet. You add the chicken back to the sauce and serve it over rice with a simple salsa of chopped tomato, chopped onion, lime juice, and cilantro. My camera battery died, so the only evidence of the deliciousness that ensued is this iPhone photo:


Sunday, March 22, 2009

My First Attempt at Baking Bread

Today, I finally got around to a project I have wanted to do for quite some time: homemade bread. I used the widely praised technique from Jeff Hertzberg and Zoë François' Artisan Bread in Five Minutes a Day. If I had known just how easy it was to bake my own bread, I would have embarked on this project long ago. Although the rising, resting, baking times took made the recipe take much longer than five minutes from start to finish, the active time is under five minutes.

Of course, any recipe can be abridged to death with varying results; it's the taste that counts, and considering that this was my first ever attempt at bread, I was pleased with the results. This technique definitely will not make you question the intelligence of bread bakers who have been baking bread the old fashioned (read, well over five mi
nutes a day) method. The bread I made a nice crust, was not all that flavorful, and the crumb was much denser and much doughier than a great artisan bread should ever be. These shortcomings were partly my own faults: I substituted whole wheat flour for half of the white flour, and I was overly eager to cut into the bread and failed to follow the instruction to let the loaf cool completely before cutting into it.

The use of whole wheat flour most likely contributed to the dense crumb, and I should have cooked the bread a bit longer as I have read that whole wheat flour requires a longer baking time. Once the loaf finally did cool down, it was less doughy, so next time I'll restrain myself when I am tempted to try a slice of still warm bread. Nonetheless, my first attempt at bread encouraged me to give this method another try. I have enough dough in my refrigerator to make three more loaves, and I know that my subsequent bread baking attempts will be more successful than my first.

The dough before it went into the oven (I was a heavy handed with my flour "dusting"):


Out of the oven:


Sliced before it had cooled:


Thursday, March 19, 2009

A Great Brownie Recipe

If you like your brownies super fudgey, definitely give this brownie recipe from Scharffen Berger a try. I don't have any pictures because my girlfriend and I absolutely demolished the batch before they had cooled enough to cut nice squares. It was absolutely worth it. Be sure to use high quality chocolate in this one; the Scharffen Berger we used gave the brownies the fruity flavors that Scharffen Berger has; it was like eating a bar of their semisweet chocolate, only better.

Tuesday, March 17, 2009

Carnitas


During the week, I rarely have much time or energy to cook anything more than the simplest of dishes. For this reason, I tend to spend my Sunday nights tending to a braised dish on the stove or a roasted meat in the oven. This Sunday, I prepared carnitas, a Mexican dish consisting of cubed pork butt that is braised in spices until all of the liquid evaporates, and then fried in it's own fat (hey, I ran 15 miles this weekend!). The nice thing about carnitas is that it is so versatile. Having researched a number of recipes, I found that nearly anything combination of ingredients can be used so long as the basic technique is followed. Realizing that it was not necessary to follow a recipe, I decided to make my own, and I was proud of the result, which follows. In order to use up some the lager I bought for the pork, I served the carnitas with Drunken Beans made with Rancho Gordo vaqueros.


Carnitas

Ingredients:
  • 3 lb. pork butt, cut into 1.5 inch chunks
  • 2 yellow onions, chopped
  • 4 cloves garlic, minced
  • 1 poblano pepper, chopped
  • 1 chipotle pepper in adobo, minced
  • Juice of 1 orange
  • Juice of 1 lime
  • 1 Tb cumin ground
  • 2 tsp. dried ancho pepper, ground
  • 1 Tb dried marjoram
  • Salt, for seasoning
  • 12 oz. lager beer
  • Cilantrol leaves, for serving
  • Lime wedges, for serving
  • Tomatillo salsa, for serving
Directions:
  1. Add first 11 ingredients (up to the salt) to a large dutch oven. Marinate for several hours.
  2. Pour in beer and add water to barely cover pork. Simmer pork over moderate heat until meat easily falls apart, approximately 2 hrs.
  3. Increase heat to medium-high and continue to cook until liquid has completely reduced, another hour and a half.
  4. Once the only remaining liquid is the pork fat, watch pork carefuly. Cook the pork cubes or shreds, turning occasionally, until brown and crispy.
  5. Serve pork over rice or in warmed toritillas. Garnish with cilantro and serve with salsa.

Sunday, March 15, 2009

A Letdown at Craft

I can't help but compare my recent meal at Craft to my recent meal at Gramercy Tavern. Both restaurants are at the same price point and operate along the same similar premise, expertly sourced ingredients prepared simply. It is no wonder that they are so similar; after all, before Tom Colicchio, no longer chef but still owner of Craft, made a name for himself on Top Chef, he was making a name for himself as executive chef at Gramercy Tavern.

Unfortunately, my meals at each restaurant were not so similar. My dinner at Gramercy Tavern was perfect in nearly every aspect, from service, to ambiance, to the food itself. Craft, on the other hand, missed on both service and, more importantly, execution. The service my dining companion and I had at Craft was not bad--our server was perfectly amicable and did nothing wrong-- but did not make me feel that the restaurant really appreciated or cared that I was dining there as I felt at Gramercy Tavern. Again, I was spoiled by my experience at Gramercy Tavern, but in this economic climate and at the price point of both restaurants, I think they should both go out of their way to make the diner feel welcome. I will note that the dining room at Craft was not entirely full on a Friday night, so it is not as if the recession should not be a worry to the restaurant.

Quibbles about the service aside, Craft's biggest fault was in execution. My dining companion ordered several of our server's recommendations: arugula & lemon salad, a roasted octopus special, roasted monkfish, and roasted Berkshire rack of pork. Aside from the monkfish, which was superb, something was missing from every dish. Both the octopus and arugula salad were lacking in flavor. While I understand and respect the idea that well-sourced ingredients require little extra flavor (see Gramercy Tavern), both of these dishes had a flavorful sauce or dressing, but there was so little of the sauce or dressing that it left both my dining companion and I wanting more. The rack of pork was a disappointment on another level; the flavors of the meat and smoky sauce (my apologies for recalling so few details of my dishes) were absolutely wonderful, and the pork was one of the best pieces of pork I have ever tasted. However, the meat was cold in the center. It was also slightly undercooked for my tastes, and I usually enjoy pork rarer than most people. As I consumed each dish, I thought of how Gramercy Tavern would have prepared the same dishes; based on the perfect execution of my meal there, I could assume that Gramercy Tavern would have done much better.

While my meal at Craft was by no means bad, it was certainly disappointing. At this price point and with enough NYC restaurants operating on similar concepts as Craft, I do not see myself returning. Nonetheless, my man-crush on Tom Collicchio is as strong as ever.

Saturday, March 14, 2009

Shrimp in Spicy Tamarind Sauce


Tonight's dinner was from Andrea Nguyen's Into the Vietnamese Kitchen. The last time I made a sauce with tamarind pulp, it was cloyingly sweet, so I was reluctant to try it again. However, Nguyen's recipe for shrimp in tamarind sauce included sriracha and fish sauce, so I decided it might be worth the gamble to use up the tamarind pulp that had been sitting in my pantry. My decision paid off, as the dish was a nice balance of spicy, sour, and sweet. I served it with Nguyen's cabbage and egg stir-fry; the best I could do as an homage to St. Patrick.

I always appreciate a recipe where I learn a tip that I can carry with me. Nguyen suggests tossing the uncooked shrimp with a generous amount of salt and then immediately rinsing the salt off the shrimp prior to cooking. She says that this quick step will "return the flavor of the sea" to the shrimp. I can't believe I have never heard this before, as this pre-salting of the shrimp imparted a briny flavor, which really did remind me of the sea. This is a step that I will take whenever I cook shrimp, and I urge you to do so, too.

Thursday, March 12, 2009

Arroz con Pollo

Pimentón must be the most often reached for spice on my spice rack. Nearly any mundane dish, from chickpeas to chicken breasts, can be instantly improved with a healthy dose of pimentón. Of course, this smoked paprika is most at home in Spanish dishes; this one reason for my undying love for Spanish cuisine. The other night, I made arroz con pollo. The below recipe is adapted from one that appears in Penelope Casas' The Food & Wines of Spain. My rice was slightly more moist than it should have been due to my use of canned tomatoes (fresh tomatoes in NYC in November, fugghedabbout it) and a fairly fatty chicken (should have drained some of the fat), but the flavor was dead on, thanks to the pimentón, of course.


Arroz con Pollo
Serves 4

Ingredients:
  • 1 chicken, cut into pieces
  • 6 Tb olive oil
  • 2 green peppers, chopped
  • 2 small yellow onions, chopped
  • 3 garlic cloves, minced
  • 2 canned tomatoes, drained and chopped
  • 2 piquillo peppers, drained and chopped
  • 1 Tb hot pimentón
  • 1/4 tsp. saffron
  • 2 cups bomba rice
  • 3 1/2 cups homemade chicken broth
  • 1/2 cup white wine
  • salt and pepper, to taste
  • Minced parsely, for garnish
Directions:
  1. Preheat oven to 325F
  2. Salt chicken pieces
  3. Add olive oil to a large skillet (or paella pan, if you have it) and heat over med-high
  4. Add chicken to pan and cook until nicely browned, about 7 min. per side. Remove chicken to plate and set aside.
  5. Add green peppers, onions, and garlic to pan. Cook until peppers have softened, about 6 min. Reduce heat if necessary so that vegetables do not brown.
  6. Add tomato and piquillo peppers to pan and cook about 5 min.
  7. Add paprika, pimentón, and rice to pan. Stir to coat rice with oil.
  8. Pour in broth and wine. Add salt and pepper and bring to a boil. Cook until rice has absorbed most of the liquid, about ten min.
  9. Place chicken pieces over rice and place skillet in oven. Cook for 15 min.
  10. Remove pan from oven and let sit, covered, for 10 min.
  11. Garnish with parsley and serve.

Wednesday, March 11, 2009

Egg Salad Sandwich with Pickled Green Tomatoes


During one of my trips to the Greenmarket in late November, looking to break up the monotony of apples and root vegetables in my tote bag, I picked up a jar of GT1000s from the Rick's Picks' pickle stand. I usually don't care for pickles, but the description on the jar
persuaded me to give these a try: "curried green tomato condiment." Green tomatoes make me nostalgic for the years of my childhood that I spent in the South, and I am a sucker for curried anything, so the purchase seemed like a no-brainer at the time. However, like many of my more whimsical food purchases, the jar of tomatoes sat untouched in my pantry for a couple of months. It was only while making an old standby, my mother's recipe for egg salad, that I found a use for the GT1000s. I am glad I did, as the tomatoes added a nice component to one of my favorite sandwiches. I have since added the pickled green tomatoes to bratwurst and sliders with great results, but nothing beats them with egg salad.


Egg Salad Sandwich with Pickled Green Tomatoes
Makes enough egg salad for more than 1 sandwich
Ingredients:
  • 2 hard-boiled eggs, peeled and coarsely chopped
  • 2 tsp. mayonnaise
  • 2 tsp. dijon mustard
  • 1/2 tsp. celery seeds
  • Salt and pepper, to taste
  • 2 to 3 slices pickled green tomatoes
  • 2 slices sandwich bread
Directions:
  1. Mix first 5 ingredients in a bowl. If mixture seems dry, add more mayonnaise. Taste for salt and pepper.
  2. Top one bread slice with egg salad. Top with tomatoes. Cover with second bread slice to make sandwich.

Sunday, March 8, 2009

Skate with Brown Butter Sauce


If you haven't cooked skate before, I urge you to give it a try. It cooks quickly, the meat is flavorful so little more than a simple sauce is required, and it is fairly inexpensive. Inspired by a skate and brussel sprout dish I saw at Momofuku Noodle Bar, I served the fish with brussel sprouts that I roasted with bacon. The fish requires little in the way of a recipe since it is fairly versatile, but here are some general steps:

Skate with Brown Butter Sauce

Ingredients:
  • 2 skate wings
  • kosher salt
  • flour, for dusting
  • 3 Tb butter
  • large splash of dry vermouth or white wine vinegar
  • 1 tsp capers
Directions:
  1. Dry skate wings with a paper towel.
  2. Salt fish.
  3. Heat a large skillet over medium high heat and add half of the butter to skillet.
  4. Dust skate wings with flour.
  5. Add fish to skillet. Cook for 5 to 6 minutes total, turning once. Set fish aside.
  6. Add rest of butter to pan. Once melted, add splash of vermouth and capers.
  7. Cook butter and vermouth until sauce is reduced and nicely brown. Pour sauce over the skate and serve immediately.

Thursday, March 5, 2009

Roasted Chicken with Salsa Verde from A16: Food + Wine

To me, a new cookbook is like a new toy to child; shortly after buying one, I just can't stop playing with it. In the case of A16: Food + Wine, I have a new toy that I don't think I will ever grow bored of. I've already sung my praises for this cookbook, but I would like to report on yet another excellent dish that I cooked from it: Roasted Chicken with Salsa Verde.

The recipe is actually for tiny roasted young chickens, but I had picked up a nice 3lb. Giannone chicken, so used that instead. I also ran out of dried oregano so I substituted dried sage for some of the oregano that the recipe called for. The chicken still turned out beautifully: a wonderfully crispy skin, juicy and flavorful meat. The salsa verde is excellent as well; my girlfriend who abhors parsely gave it her approval, so don't be alarmed by the cup of parsley that goes into the sauce.

There are two keys to this dish. First, spend a little extra to get a quality bird; chicken quality makes an especially big difference when it comes to simply roasted chicken. Second, the chicken benefits greatly from the two day seasoning process. Planning a recipe two days in advance can be a hassle, but after two days, the seasoning permeates the meat nicely. As an added bonus, this process allows you to just toss the chicken in the oven when you are ready to cook it rather than taking the time to wash, dry, and season the chicken first.


Roasted Chicken with Salsa Verde


For the Chicken:
  • 1 good-quality 3lb. chicken, washed and thoroughly dried
  • 3 Tb kosher salt (yes, 3; don't be shy)
  • 1 1/2 Tb dried oregano
  • 1 1/2 Tb dried sage
  • 1/2 ts dried chile flakes

For the Salsa Verde:
  • 1cup flat leaf parsley
  • 1/2 ts dried chile flakes
  • 1/2 ts capers, drained
  • 1/2 cup fresh breadcrumbs
  • 1/2 cup extra virgin olive oil
  • 1/2 of a lemon
  • small clove of garlic (or 1/2 of a large clove)
  • pinch of salt

Directions:
  1. Two days prior to cooking, grind oregano, sage, and chile flakes in a spice grinder. Rub chicken skin and cavity with salt. Then, rub spice mixture on skin and in cavity. Cover and refrigerate for two days.
  2. Cook chicken at 450F until cooked through, about 50 minutes. Meanwhile, make the salsa verde.
  3. For salsa verde, add parsley, breadcrumbs, chile flakes, capers, and garlic to food processor. Pulse until well blended. While running processor, drizzle in olive oil. Add lemon juice and pinch of salt and process to blend.
  4. Once chicken is cooked, let it rest for 10 min. Serve with salsa verde.


Wednesday, March 4, 2009

Christmas Lima Bean Soup with Short Ribs and Porcini Mushrooms

I’m not sure why I don’t make soup more often. Generally, soup is:

- Easy
- Cheap
- A good way to use up neglected items from the pantry and fridge
- Still delicious when reheated (and soup makes plenty of leftovers to reheat)
- Difficult to screw up

Most of the above can also describe braised dishes, my favorite dishes to cook, but for whatever reasons, I rarely make soups. Last week a recipe for Lima Bean and Porcini Soup that appeared in the New York Times caught my eye because it looked simple enough and would require only a short trip to the store. I decided that for once, I would tackle a soup recipe.

I made a few substitutions based on what I had on hand, using excellent Rancho Gordo Christmas Limas in place of traditional lima beans and short ribs in place of beef shanks. Also, my beans took nearly two hours to cook (due to not being soaked for long enough, I imagine), so the soup had more of a stew consistency than that of a soup. Nonetheless, the earthy, meaty flavors of the lima beans and mushrooms combined with the short ribs produced a hearty soup. Despite the Nor’easter that would be dumping snow upon New York later that night, this soup made me slightly sad that winter was almost over and that time was running out to try more soup recipes.

Here is the soup in the pot:


And in the bowl:


Sunday, March 1, 2009

Braised Arctic Char with Basil, Almonds, and Lemon

Recently, I have been obsessed with the cookbook A16: Food and Wine by Nate Appleman and Shelley Lindgren. This cookbook showcases beautiful photography, an very informative section on the wines of southern Italy, and most importantly, an amazing selection of southern Italian-inspired recipes. So far, I have made the Ragu Alla Napoletana, Braised Halibut, with Pistachios, Preserved Meyer Lemon, and Capers, and Braised Kale with Tomato and Anchovy Soffrito. All have been excellent. I am looking forward to giving the pizzas, ricotta gnocchi, and meatballs a try; each of these recipes will be upcoming weekend projects. Tonight, I kept it simple; adapting two recipes from the cookbook to serve braised arctic char with basil, almonds, and lemon along with a side of green beans braised in the tomato and anchovy soffrito leftover from last weekend's kale. While the fish was my least favorite of the recipes I have tried from the book, it was still tasty and quite easy to prepare.


Braised Arctic Char with Basil Almonds, and Lemon
Serves Two

Ingredients
  • two six 0z. arctic char filets
  • kosher salt
  • 1 cup packed basil leaves
  • 1/4 cup olive oil, plus more for drizzling
  • handful of almonds, toasted and coarsely chopped
  • 2 lemon wedges
Directions
  1. Salt arctic char 1 hr. prior to cooking and bring to room temperature
  2. Preheat oven to 400F
  3. In a food processor, pulse basil until it forms a paste
  4. Drizzle in olive oil to food processor and process until basil and oil form a smooth paste
  5. Add a tiny pinch of salt to basil mixture
  6. Place filets in skillet large enough to comforatbly hold both filets
  7. Spoon basil mixture on top of both filets
  8. Add water to skillet to come half way up filets
  9. Place skillet in oven. Bake about 10 minutes or until fish can be flaked with a fork.
  10. Plate filets. Top with chopped almonds and a drizzle of olive oil. Serve with lemon wedges.

Cooking Steak in a Studio Apartment

As much as I love to spend time researching complicated recipes and toiling in the kitchen, sometimes all I want is some meat and potatoes. When I was younger, my father would often grill steaks for the family on Saturday nights, and I've try to recreate this meal in my kitchen every so often. The trouble is that I do not have access to a grill, and I find that steaks broiled in the oven or seared on the stovetop are rarely as delicious as a grilled steak. Without a grill, it's impossible to achieve the perfect crust or the smoky flavor of a grilled steak, but I have been following a technique for cooking steak indoors that appeared in The Wall Street Journal a year or so back and have had great results with it. It's no match for a steak on the grill, but the technique does a good job of getting a nice crust and cooking the steak to a perfect medium rare.

Last night, I cooked filet mignons using this technique. I served them with a baked potato, sauteed spinach, and a California cabernet. While the meal did not touch that of the steak Saturday of my youth, it certainly hit the spot. The picture doesn't do it much justice, but here you go:


Steak, Cooked Indoors


Ingredients
  • 2 very thick filets mignons or strip steaks
  • Kosher salt
  • 2 Tbs grapeseed oil
Recipe
  1. 2 hrs prior to cooking, let steaks come to room temperature on counter
  2. Heat oven to 400F
  3. Liberally salt both sides of steak
  4. Heat oil in cast iron or other heavy bottomed skillet over medium high heat until very hot
  5. Add steaks to pan, sauteeing for 2 min. per side
  6. Put pan in oven and roast for 8 to 9 min. for medium-rare
  7. Once cooked, put steaks on heated plate and cover with foil. Let rest for five min. before serving

Welcome to My New Home!

Welcome to the new home of Culinary Studio!

My name is Eddie, and I live in a tiny studio apartment on the Upper East Side of Manhattan, New York, with an even tinier kitchen. What I lack in counter space, I make up for with an indefatigable interest in cooking and food. I shop at no fewer than 3 different stores and markets each weekend, use much of my free time read about food, and spend much of my weekends laboring over my stove top. I am still very much a novice cook. This blog will follow my culinary adventures (and misadventures) as well as my foodie experiences in New York City. While in the kitchen, I will try my best to follow three goals:

1. Try my best to utilize local and sustainable ingredients

2. Expand my cooking knowledge and repertoire

3. Never waste a meal!

I hope you enjoy my blog!

LinkWithin

Related Posts with Thumbnails